

How to Install Dock Joists Using the Dock Hardware Add-A-Joist Kit
Dock joists are the internal support beams that run across your frame, holding decking in place and keeping the dock rigid. Installing them correctly ensures your dock stays level, stable, and strong for years to come. In this quick guide, we’ll walk through how to add joists to your dock frame using the Dock Hardware Add-A-Joist Kit — a complete hardware set that includes everything you need for secure, professional-grade connections.

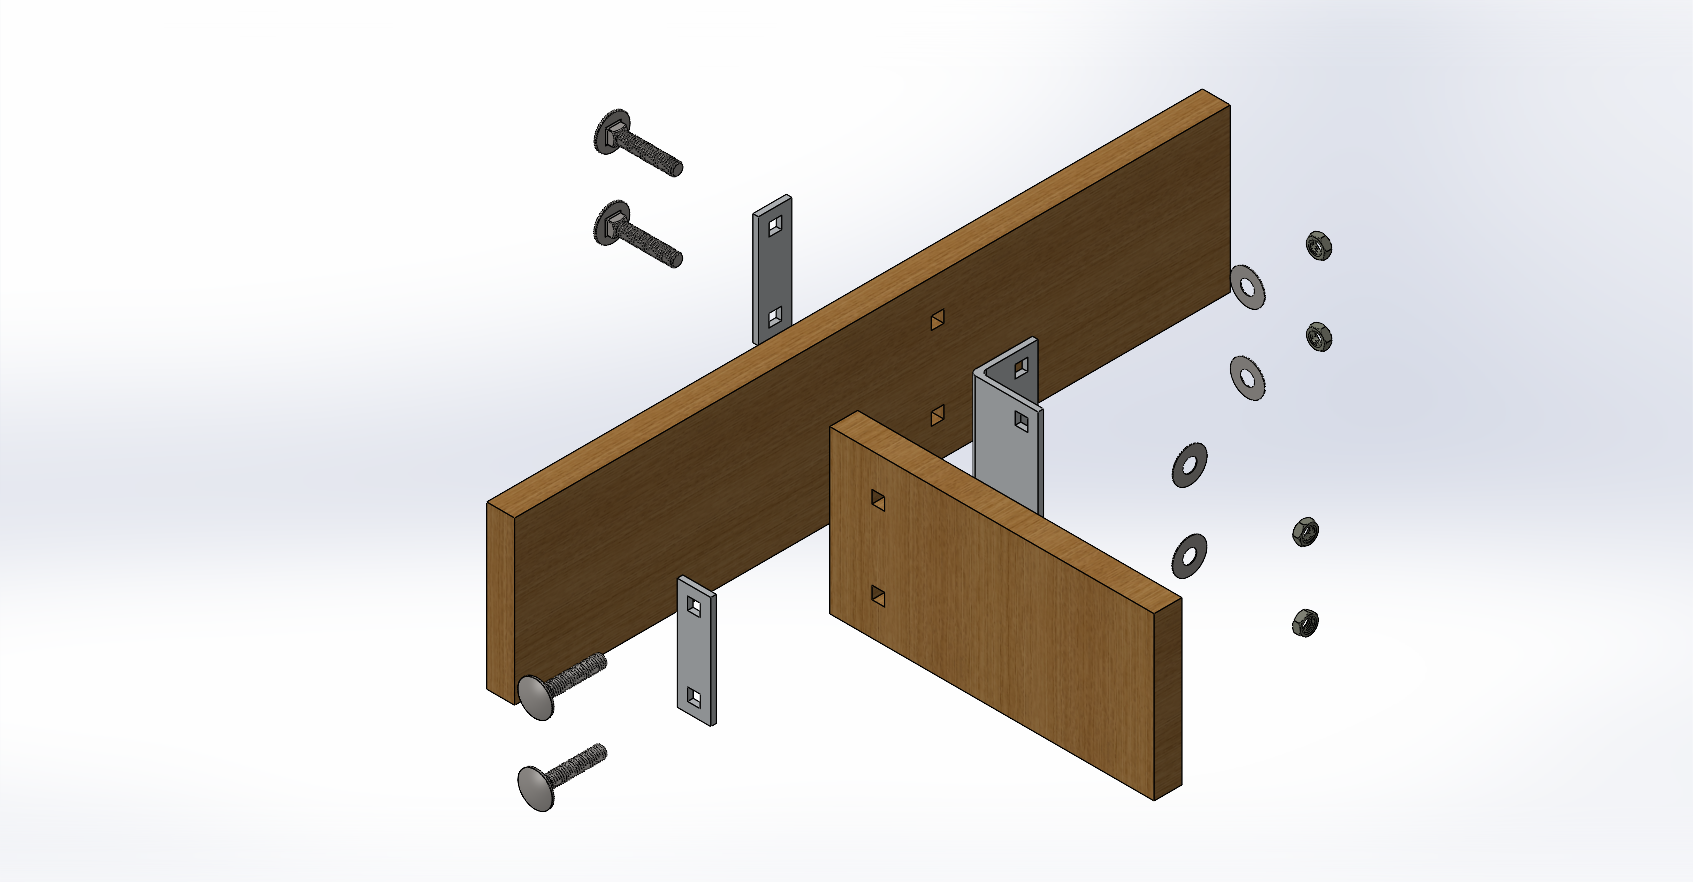
What’s Included in the Add-A-Joist Kit
- (2) DH-A Dock Angles – ¼″ hot-dip galvanized steel interior brackets
- (4) DH-W Washer Plates – exterior backing plates that spread load
- (8) ½″ × 3″ Galvanized Carriage Bolt Sets – bolts, washers, and nuts for both ends
All components are precision-made from hot-dip galvanized steel for maximum corrosion resistance in saltwater, brackish, and freshwater environments.
How to Install Dock Joists
Each joist spans between the perimeter boards of your dock frame. The following steps show how to fasten them securely using the Add-A-Joist Kit.

- Determine Spacing: Mark joist locations at 16″ or 24″ on center, depending on your decking thickness and water conditions.
- Position the Angle: Align a DH-A Dock Angle on the inside corner where the joist meets the perimeter board. Keep the bracket flush with both faces.
- Drill the Holes: Using a 9⁄16″ drill bit, drill through both pieces of lumber to match the pre-punched 9⁄16″ holes in the DH-A bracket.
- Add Washer Plates: On the outer face, place two DH-W washer plates to back the connection.
- Insert the Bolts: Insert the ½″ × 3″ galvanized carriage bolts through the washer plates and into the bolt holes. Add washers and nuts, then tighten evenly until snug.
- Repeat on the Opposite End: Fasten the other side of the joist the same way to fully secure it between frame members.
- Pro Tip: Keep all interior angles on the same side of each joist, but alternate sides from one joist to the next to reduce frame flex and increase overall stiffness.

Why This Method Works
- Even Load Distribution: Angles and backing plates clamp the lumber from both sides.
- Increased Rigidity: Through-bolted hardware ties the frame together and prevents twisting.
- Corrosion Resistance: Hot-dip galvanized steel stands up to moisture and salt exposure.
- Easy Alignment: Pre-punched 9⁄16″ holes simplify drilling and ensure consistent spacing.
Build It Right with Dock Hardware
The Dock Hardware Add-A-Joist Kit gives you everything you need to install support beams correctly — heavy-duty brackets, washer plates, and carriage bolts all in one package. It’s the same setup trusted by dock builders for durable, professional results that last season after season.
Ready to start building your dock frame?
Shop the Dock Hardware Add-A-Joist Kit →
Keywords: how to install dock joists • dock joist spacing • dock frame construction • add a joist to dock • dock hardware brackets • galvanized dock hardware